
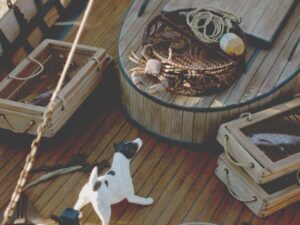
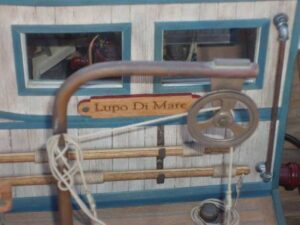
Since completing the “Lupo Di Mare” (Sea Dog in Italian), a 60 inch 1932 era Monterey Clipper used for salmon and crabbing on the West Coast, many fellow modelers have asked how she was finished. Here are some thoughts and tips which may help you weather your next model.
I’m no expert as the Lupo was only my second attempt at aging and weathering. In fact, deciding to weather a model was a difficult choice, probably because it seemed like such an unnatural process. Most of my prior models were classic runabouts and cruisers which required precision building methods and exquisite high gloss finishes. For me, the thought of attempting finishing trashy and weather-beaten work boats was certainly uncharted territory.
That all changed a few years ago at a regatta when my wife noticed this old fishing boat next to my new 57” scratch built mahogany Chris Craft. She carefully looked at both boats, pointed to the raunchy old thing and asked, “So, when are you going to build a good boat like that one?”
It was like a dagger to the heart. Apparently, my wife was not the only admirer of this boat as I noticed a vast amount of attention being paid to this scrungy looking model. The crowds loved it, and on closer inspection, I too noticed the amount of skill it took to make it so realistic looking. Obviously, a well aged and weathered model can get the looks of the crowds, participants and judges. This kindled a desire in me to find out how this model was weathered. So, after the show I cornered the master builder about how he did it. We talked for almost 2 hours as I carefully took notes.
Still, it took years for me to get the courage to try my hand at weathering. I’m not a gambler so I had to find methods and strategies that “reduced the risk” of messing up a perfectly good model. What follows are some of the processes I use to age and weather my boats. It is by no means the only way to achieve success. Each of us possess unique skills and abilities and what works for me may not work for everyone. I offer these ideas as a guide only. Feel free to use what you deem appropriate. Remember that the following information is intended to help you determine how your finished model will look like before you actually begin assembly.
Conceptualization and Preparation In thinking about aging a model, first ask yourself, “Is it a good subject for weathering?” In general working boats such as tugs, fishing, river and pusher boats, barges, etc are very good candidates. Also, models that use wood or metal as a primary construction material seem to make better subjects. You’ve heard the saying “Build the boat in your mind first and then execute the plan”. This also applies to painting and finishing. You probably have plans, drawings, or photos of your boat. As you study your project, think about types of paint, their application, colors, and balance. Consider how finishes such as high gloss, satin, or dull may look. If the model is completely thought thru you’ll get a total picture of it in your mind, which will help you with the finished product.
Pre-Planning and Experimentation
In aging and weathering, pre-planning is essential. It’s a commitment that is made before construction begins. Your decision to age the model should be a carefully planned one. To do this you’ll be experimenting. But not on the boat!
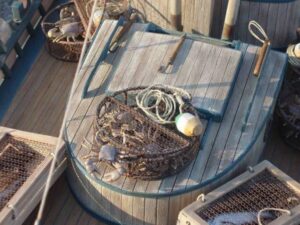
Of paramount importance is to decide what materials will be used to complete the model. The Lupo is a fiberglass hull. Vertical Grain Douglas Fir was used for the deck and cabin structures, and Basswood was selected for the outriggers and main mast. Vertical Grain Douglas Fir is used by some West Coast modelers for their working boats. It has a straight and tight grain with light and darker brown colors for a very scale like appearance. I highly encourage the use of this wood on your work boats.
I usually mill my own lumber because you can the match grains and colors of the woods. Once you’ve tried it you won’t use overpriced pre-cut hobby woods again.
Once you have the construction materials the experimentation begins. After cutting the lumbers that will be used on the model, I take the worst looking pieces that will not be used and glue them to various pieces of scrap plywood. I use these as ‘test boards’ to determine exactly how certain paints, stains, and caulking adhere to woods, fiberglass, and/or plastic.
For all the wood on my model I make up several test boards and run them thru a wire brush on a drill press. If you don’t have a drill press a slow speed drill will do. This is called exposing the grain which helps give a used and worn look. This variance in texture and color is what you’re looking for particularly in deck planking. Deeper wired brush grooves stain darker than untouched pieces. Start with a soft or medium wire brush first. Remember flat horizontal areas of the boat (roof tops, decks, cap rails) age more quickly than vertical pieces such as sidings, trims, etc. So try adjusting your wire brushing depths to the appropriate part of the boat.

Selecting Paints and Stain
Now it’s time select your stain and paints. I wanted the Lupo to look as though it had been working hard at sea over the last several seasons and in need of restoration. I used water based acrylic enamel paint by Delta Ceramcoat. This particular paint dries dead flat without gloss (especially on wood). It’s available in most hobby and craft stores, and comes in small easy to use plastic squeeze containers. It’s cheap, comes in loads of colors, and dries in 30 minutes or less. Most importantly, it thins and cleans up easily and mixes with other colors and materials. I assume other brands such as Americana are just as good. Lupo was hand painted by brush, no spraying.
I used Howard Restor-A –Finish, Golden and Dark Oak to stain the individual deck planks. It’s primarily used to restore color and luster to finished furniture. It’s thin like water and when applied to bare wood penetrates lightly. It’s easier to control than stains so multiple coats can be used to deepen the color.
For the caulking lines (between individual deck planks) I use everyday household spackle such as Synko Exterior Spackling Paste. It can be mixed with Delta Ceramcoat for color. On the Lupo I mixed Charcoal Gray into the spackle for a dark gray appearance between the brown deck planks.
Colors
Now the fun starts. It’s time to select your colors. I purchased an assortment paints that I thought would look good as the base colors for the boat. The colors you select will, of course, depend on your personal good taste. I highly recommend that you also pick up some Charcoal Gray, Leichen Gray, Black, Soft Gray, Antique White and a soft brown that will later be used for “washing and dry brushing colors” over the base paints. In addition, purchase a package of Hobby Sticks (tongue suppressors).
Begin painting the sticks with all the colors you think will look good on the boat, the hull above and below the water line, cabin, and trim areas. Thin the paint and use multiple coats. Think about using “Angle Brushes” versus square cut brushes. I find they cut a cleaner line. You may wind up with dozens of painted color sticks so be sure to label each. Don’t be afraid to mix colors. The Lupo’s colors are combinations of pre-mixed colors. Remember these are just your base colors. If the base colors are a little on the light side, don’t worry because you’ll be adding “washes” over it when you actually paint your model later.
Now it’s time to check all your base colors together. Try to determine which colors look the best together ( hull colors, deck stains and caulking lines, cabin and trim colors). These colors should flow together, be relaxing and pleasing to the eye, and look well together.
Once you narrow down the base colors of your boat, select a stain for the deck planking and apply it to a new test board. After the stain dries mix the spackle and paint (I used Charcoal on The Lupo) for the deck caulking lines. When mixed, force it between the plank lines with a putty knife. Try to fill all the voids, no air holes. It’s messy, so scrape as much as you can off and run a clean wet sponge to take as much excess off as possible. Wet your index finger with water and run it down each caulking line to depress the line. The caulk line should be below the top of the deck. When dry gently sand and apply the deck stain to the planks. Use angle brushes and try to keep the stain out of the caulking. If it creeps in, no problem, they’re good character marks. Again, remember that you are applying this technique to a test strip and not the actual model.
Final Touches With Washes
When you are satisfied with your base colors and stain/caulking combination, it’s time to experiment for the final touches.
In aging and weathering, think about the appearance of wood that has been exposed to the sun and water over time. Painted finishes break down and lose their luster as the wood grains and natural wood color begin to show through. Also painted wood that has been exposed to weather is not a continuous color but rather a combination of subtle highlights and textures. To achieve this appearance try “washing” over your base colors on the various test boards you have selected that look best together.
A “wash” is approx 10 to 20 drops of water to 1 or 2 drops of paint. It is a subtle and gradual build up of colors. Experiment by washing the test boards with a fan brush. The fan brush leaves streaks but you’ll be applying several wash layers and colors. You want these streaks to show as opposed to a single heavy coat which will probably hide any wood detail. You’re washing and highlighting not painting. If your test strip still looks too streaky, try using a technique call ‘dry brushing.’ Dip a dry square or angle brush in the wash, then pat one side of the brush on a paper towel before coloring the board. Soft gentle strokes are key and will accentuate wood details when using this method.
White base colors often look good when washed with Lichen Gray. It’s a light brownish gray earth tone that resembles dirt. Darker colors such as trims look good when washed with charcoal or lighter grays or even lighter browns.
Next try washing over your deck and caulking boards with light and dark grays to give it a more “work” appearance. Gray tones over brown go well together.
Remember, washing is a gradual process. But if thin coats of wash are applied and dried with a hair dryer, dozens of coats can be done in a day.
To further accentuate and highlight well worn areas of the boat such as grab rails, handles, lower trim boards try using “Weathering Pastels” (like colored chalks). When applied with a dry brush you can simulate additional dirt, rust, smoke, and weather stained appearances. Once applied to your model you can rub it with your finger or seal your chalks with a topcoat such as Testors Dullcoat.
Washes over a fiberglass hull or gel coat are a bit trickier. If you have a spare piece of fiberglass like a deck cut out, use it as a test board. After your usual primer and paint have been applied and allowed to dry, try mixing your color wash with a few drop of Elmer’s Carpenter Glue. It leaves a slight tacky surface and wash colors adhere rather than roll off the paint making it easier to simulate age and wear.
Final Check Before Assembly
After washing, recheck the final colors together on all your test boards. Look at the entire package and determine if your range of colors, stains, and washes complement each other. If you’re still not sure, duplicate your colors onto larger test boards and make absolutely certain everything looks satisfactory. Take your time. It’s much easier to make changes now versus making them later on your actual model. Remember, in most cases if two models are relatively equal in their construction, the better looking finish gets the better place in the judging.
Final Thoughts
If everything looks good, pat yourself on the back and congratulate yourself for a job well done. It’s now time to begin construction of the model. Here then are some final thoughts that will help give your new model that award-wining finish:
- Aged pieces don’t have sharp corners. Gently round them off.
- Cabin and deck boards shrink with age, give them a bit more space to create older character lines.
- Do all your wire brushing before the boards are glued to the boat.
- Paint all your trim boards first, on 3 sides, and then glue. It’s a cleaner line and you touch up only the ends with a small brush.
- Use pastel chocks to get the dirtier or rusty areas you want. Rub them in with your finger tips to keep it permanent.
- If you are using brass fittings (www.wetgoose.com) dip or paint them with “Blacken- It”. If you want a natural blue/green appearance found on brass brush it with “Patina-It. If they look a bit dark carefully rub the edges with fine 00 steel-wool.
- If you’re using plastic or pot metal/lead type fittings (shame on you) paint them out in the colors you want and use the wash and dry brush techniques above.
On the maiden voyage of the Lupo Di Mare an upset elderly woman walked up, and looked me square in the eye. Pointing her finger she said “Sir, you should be ashamed at yourself letting a nice boat like this get into this condition. Take it home and paint it!”. I considered that the ultimate compliment.
Best of luck finishing your next boat.
Available thru Micro-Mark, Small Tool Specialists at 1-800-225-1066 or www.micromark.com
- Weathering Pastels: Earth Tone #60763 Gray Tone #60763
- Dry Brushes: # 81081 Set of 4
- Angle Paint Brushes: #60778 Set of 4
- Blacken-It: #60864
- Patina-It: #60865